For most people, the most mysterious part of baking bread is kneading. Somehow, you must use your hands to transform a sticky or stiff pile of batter into a smooth ball of dough. It is easy, until you get the hang of it, to find yourself either up to your elbows in sticky dough or arm wrestling with a stiff dough that is destined to rise no higher than a doorstep.
You can probably figure out that the cause of the first condition is too much liquid and the cause of the second condition is too much flour. So why don't recipes just tell you exactly how much flour to use? Because they can't. If your flour is older, it will absorb more liquid. If the weather is humid, it will absorb less. How you store your flour, whether you shake the cup as you measure, even the variety of wheat your flour was ground from, it all makes the process too unpredictable. Although it is initially hard to master, the skill of turning a wet batter into kneadable dough is one that you never lose.
We have already seen several tricks of the trade:
---The glob of shortening that we added to the batter will help make the bread fine grained and tender, but it will also make the dough less likely to stick to your hands. As you get more experienced, you can cut down the fat in the recipe.
---Use bread flour for at least some of the flour. A cup of semolina flour (also called pasta flour) used as part of the 3 cups of flour in the batter will help make the dough kneadable.
---Take your time while adding flour to give it time to absorb the liquid. If you have small children around you have guaranteed interruptions. If not, take a break to put laundry in the dryer or check your email.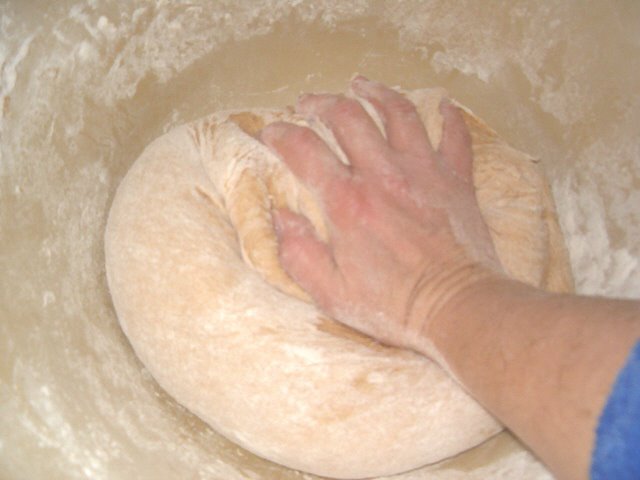
I usually use about 4-5 cups total whole wheat flour and then switch to white flour. The white flour absorbs less liquid so I am less apt to use too much. Stirring thoroughly after each cup of flour, I find that as the dough gets stiffer I am stirring less and folding more. With a strong wooden spoon I can turn the dough in the bowl and fold it over on itself, sort of like kneading without getting my hands into it yet. Already there are drier looking bits of dough on the sides of the bowl; I scrape these down and into the wetter center of the dough. Eventually I am just turning the dough over on itself and only occasionally adding flour. This is a good time to take one more short break and let the dough get used to itself again.
When I come back to the dough after 5 or 10 minutes it is ready for hands-on kneading. Whether I knead on the table or in the bowl, the action is the same: flatten the dough with the heels of my hands, then fold it over on itself, turn it a little, then flatten, fold and turn again. At first I need to keep putting flour on my hand to keep the dough from sticking, later it gets to be moist, not sticky so my bare hands are fine.
It is impossible to hand knead standard bread dough too long. I usually look at the clock once the dough stops sticking and then try to keep up a good rhythm for 5 or ten minutes. Time spent kneading is very much like time spent in deep thinking. You stretch thoughts and fold them over on themselves until myriad elements take on a new identity of their own. If I am pressed for time I will knead for less time, but I know I'm gambling. Kneading develops the gluten that will make the loaves rise with strength; insufficient kneading makes loaves that tend to fall if you sneeze at them.
After kneading it is time to let the dough rise. If I am kneading on the table, I just invert the bowl over the dough and leave it alone. If I am kneading in the bowl, I leave it in the bowl, but cover the bowl with my Corian board or a cookie sheet to keep the dough from drying out.
Next: Shaping Loaves
3 Responses to “Kneading”
Leave a Reply
About me
- I'm Susan Och
- From Lake Leelanau, Michigan
Previous posts
Archives

ATOM 0.3
Looking for more?
There's more to food than just nutrition, otherwise we would all be eating custom-formulated kibble. I didn't exactly learn to bake from my grandmother, but my ancestors, even the ones I never met, have informed and influenced my lifelong exploration of cooking and food. Want to read more? Check out this entry from my home blog, French Road Connections
Hi
I'm new to baking bread.My brother made me a kneeding board.It is fresh wood 18 X24 inches.Do I oil it or leave it as is?If oiling it what with?My wife thinks this is a no brainer.
Joh
Well, what does your wife think? You're allowed to take her advice every once in a while....
My finish carpenter husband warns against using any kind of cooking oil on your board, as they all eventually turn rancid and smell bad. He suggested a wax finish, but something food grade, like beeswax or the paraffin that is sold in the canning section of the grocery store. He melts the wax (over a double burner, as it is flammable) then coats the board and rubs it in. When it hardens, he scrapes off the excess with a plastic scraper, then rubs it down again.
A simple approach would be to use a commercial cutting board finish. These are typically a mineral oil and beeswax combination. You will need to apply a new coat every time you put the board away until the pores of the wood have absorbed all they can absorb. After that, your board is "seasoned" and you only need to refresh the finish when it starts to look worn.
This comment has been removed by a blog administrator.